
introduction:
Are you struggling to capture a specific part of your screen on your Windows 7, 8, or XP computer? Don’t worry; you’re not alone! Many folks find themselves in a pickle when they want to take a screenshot of only a certain area but aren’t sure how to do it without using the Print Screen button.
Why Capture a Specific Area?
Before we dive into the “how,” let’s quickly touch on the “why.” Taking a screenshot of a particular area can be super handy in various situations. Maybe you want to share a funny meme snippet with your friends, highlight a specific error message to seek tech support or capture a part of an image for a school project. Whatever your reason, knowing how to snap that specific portion of your screen can save you a lot of time and hassle.
The Classic Print Screen Method (and Its Limitations)
Typically, when people think of taking a screenshot on a Windows computer, they immediately think of the “Print Screen” button. Pressing this button captures an image of your entire screen and copies it to the clipboard. You can then paste it into an image editing program like Paint and save it from there. However, this method has its drawbacks, especially if you only want to capture a specific area.
Enter the Snipping Tool
Luckily, Windows has a built-in tool that makes capturing specific areas of your screen a breeze – the Snipping Tool. This nifty little utility has been around since Windows Vista and continues to be available in Windows 7, 8, and XP.
What is the Snipping Tool?
The Snipping Tool is a simple yet powerful program that allows you to capture screenshots of your screen. Unlike the Print Screen method, the Snipping Tool lets you select the exact area you want to capture, making it perfect for those times when you only need a portion of the screen.
How to Use the Snipping Tool:
-
Open the Snipping Tool: You can find the Snipping Tool by searching for it in the Start menu or by navigating to Start > All Programs > Accessories > Snipping Tool.
-
Select Your Snip Type: Once the Snipping Tool is open, you’ll see a small window with several options. Click on the “New” button to start a new snip. You can choose from four different types of snips: Free-form Snip, Rectangular Snip, Window Snip, and Full-screen Snip. For capturing a particular area, the Rectangular Snip is your best bet.
-
Capture Your Snip: After selecting the Rectangular Snip option, your cursor will turn into a crosshair. Click and drag to select the area of the screen you want to capture. Release the mouse button once you’ve outlined the desired area.
-
Save or Share Your Snip: Once you’ve captured your snip, you can annotate it with a pen or highlighter, if needed. Then, simply click on the floppy disk icon to save your snip as an image file or use the sharing options to send it directly via email or other apps.
Alternative Methods
If, for some reason, you don’t have access to the Snipping Tool or prefer not to use it, there are a few alternative methods you can try:
-
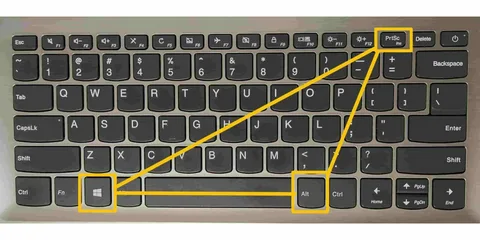
Windows Key + Shift + S: This keyboard shortcut, introduced in Windows 10, allows you to capture a selected area of the screen and copy it to the clipboard. However, this method may not be available on older Windows versions like 7, 8, or XP.
-
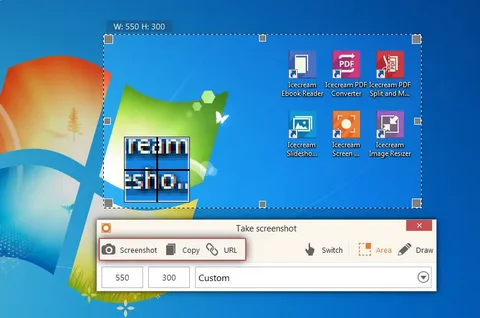
Third-Party Screen Capture Tools: There are also numerous third-party screen capture tools available for Windows that offer more advanced features than the built-in Snipping Tool. Some popular options include Snagit, Greenshot, and Lightshot.
Wrapping Up
And there you have it – a simple guide to capturing a specific area of your screen on Windows 7, 8, or XP without using the Print Screen button. Whether you’re a student, a professional, or just someone who loves to share funny moments with friends, knowing how to take a screenshot of a particular area can come in handy in all sorts of situations.
Conclusion:
Taking a screenshot of a particular area on your Windows 7, 8, or XP computer doesn’t have to be a daunting task. By utilizing built-in tools like the Snipping Tool or exploring alternative methods, you can capture exactly what you need with ease. Whether you’re documenting an error message for tech support, sharing a funny moment with friends, or gathering research for a project, knowing how to snap that specific portion of your screen can save you time and frustration.